
Application security is a vital piece of our overall success as developers. Many of us have learned and applied role-based or claim-based authorization. Overall, this has been “good enough”. Unfortunately, there are still many use-cases it can’t handle gracefully. We call one approach that solves these use-cases policy-based authorization.
Today we’re applying policy-based authorization in ASP.NET Core and understanding what exactly that means. You can find the code for today’s post on Github.
Before we get started…
Before we start diving into the meat of this post, I feel it is important to make sure we clear up some terminology and concepts. First of all, there is a difference between authentication and authorization. We define Authentication as “we know you are who you say you are.” On the other hand, we define Authorization as “we know what you’re allowed to do”.
I imagine you’re familiar with role-based authorization. Role-based authorization simply states that we allow access based on the authenticated user’s roles. Users with a matching role have access. Those without, don’t.
You might also be familiar with claim-based authorization. A role is a type of claim, but it isn’t the only claim type. We could look for a claim based on their country, language, or really, anything.
Now that we have a basic understanding of some types of authorization usually in place. We also understand the difference between authentication and authorization. So, let us proceed.
What is policy-based authorization?
Let’s borrow from Microsoft’s definition: policy-based authorization “…consists of one or more requirements.” Requirements can be anything! A role. Maybe a claim. Possibly a combination of the two. Possibly something else. Essentially, any check you wish to apply as a gatekeeper becomes a valid requirement. Allow that to sink in. Do you realize just how powerful this is?
Out of the box, ASP.NET Core Authorization has a default policy that allows any authenticated users. In the past, you’ve likely modified this by adding an Authorize attribute at a controller or attribute level. This attribute would likely have contained one or more roles.
In the new world, however, instead of specifying roles, you’d add an Authorize attribute that specifies a Policy. One important note here is that having multiple Authorize attributes — whether a combination from Controller and Action level or multiple at either level — is additive in nature. This means that each one must pass to gain access.
Let’s get started
Let’s dig in now that we have a rudimentary understanding of what policy-based authorization is! We start by implementing authentication. In my example, I’m using Basic Authentication and API Key authentication schemes. In a real-world application, you will not use Basic Authentication. That’s a no-no.
services
	.AddAuthentication(AuthenticationSchemes.BasicAuthentication)
	.AddScheme<BasicAuthenticationSchemeOptions, BasicAuthenticationHandler>(AuthenticationSchemes.BasicAuthentication, null)
	.AddScheme<ApiKeyAuthenticationSchemeOptions, ApiKeyAuthenticationHandler>(AuthenticationSchemes.ApiKey,
		opts => Configuration.Bind("App", opts));
In the previous code block, I’m adding authentication and specifying the default scheme as BasicAuthentication. The application applies the default scheme only when a scheme isn’t specifically requested. I specify a default scheme in this case. You aren’t required to do so, however. Finally, you’ll notice that I’m adding the handlers for the two different authentication schemes.
The next important part is actually setting up the policy handlers. I personally prefer having a separate file containing policies. In the following sample, I’m adding authorization, calling my policy builder, and setting a FallbackPolicy. Normally FallbackPolicy is a no-op. In this case, however, I’m assigning it to my DefaultAccessPolicy. FallBackPolicy is automatically assigned to any endpoint that doesn’t otherwise define an authorization requirement. For more information about Default and Fallback policies, I invite you to read Andrew Lock’s excellent post.
Let’s go ahead and add authorization to our API:
services.AddAuthorization(options =>
{
	options.AddAuthorizationPolicies();
	// setting fallback applies this policy to any endpoint that doesn't explicitly define authorization (see Configure:app.UseEndpoints)
	options.FallbackPolicy = AuthorizationPolicies.DefaultAccessPolicy;
});
Policy-Based Authorization Policies
So now that we’ve hooked up authorization, let’s go over our individual policies:
public static class AuthorizationPolicies
{
	public const string DefaultAccess = nameof(DefaultAccess);
	public const string XApiKeyAccess = nameof(XApiKeyAccess);
	public const string XServerKeyAccess = nameof(XServerKeyAccess);
	public const string BasicAuthenticationOrXApiKeyAccess = nameof(BasicAuthenticationOrXApiKeyAccess);

	public static AuthorizationPolicy DefaultAccessPolicy { get; } = CreateDefaultAccessPolicy();
	public static AuthorizationPolicy ServerKeyPolicy { get; } = CreateServerKeyPolicy();
	public static AuthorizationPolicy XApiKeyPolicy { get; } = CreateXApiKeyPolicy();
	public static AuthorizationPolicy BasicAuthenticationOrXApiKeyPolicy { get; } = CreateBasicAuthenticationOrXApiKeyPolicy();

	private static AuthorizationPolicy CreateDefaultAccessPolicy()
	{
		return new AuthorizationPolicyBuilder()
			.AddAuthenticationSchemes(AuthenticationSchemes.BasicAuthentication)
			.RequireAuthenticatedUser()
			.Build();
	}

	private static AuthorizationPolicy CreateServerKeyPolicy()
	{
		return new AuthorizationPolicyBuilder()
			.AddAuthenticationSchemes(AuthenticationSchemes.ApiKey)
			.RequireClaim(ClaimTypes.ApiKeyClaim, HttpHeaderKeys.XServerKey)
			.RequireAuthenticatedUser()
			.Build();
	}

	private static AuthorizationPolicy CreateXApiKeyPolicy()
	{
		return new AuthorizationPolicyBuilder()
			.AddAuthenticationSchemes(AuthenticationSchemes.ApiKey)
			.RequireClaim(ClaimTypes.ApiKeyClaim, HttpHeaderKeys.XApiKey)
			.RequireAuthenticatedUser()
			.Build();
	}

	private static AuthorizationPolicy CreateBasicAuthenticationOrXApiKeyPolicy()
	{
		return new AuthorizationPolicyBuilder()
			.AddAuthenticationSchemes(AuthenticationSchemes.BasicAuthentication, AuthenticationSchemes.ApiKey)
			.AddRequirements(new ApiKeyOrPublicResourcesAuthorizationRequirement(HttpHeaderKeys.XApiKey, Roles.Administration))
			.RequireAuthenticatedUser()
			.Build();
	}

	public static void AddAuthorizationPolicies(this AuthorizationOptions options)
	{
		options.AddPolicy(DefaultAccess, DefaultAccessPolicy);
		options.AddPolicy(XServerKeyAccess, ServerKeyPolicy);
		options.AddPolicy(XApiKeyAccess, XApiKeyPolicy);
		options.AddPolicy(BasicAuthenticationOrXApiKeyAccess, BasicAuthenticationOrXApiKeyPolicy);
	}
}
In the above code, we’re creating four separate policies. The first one requires authentication via the Basic Authentication scheme. We set this as our FallbackPolicy. Next, we define two different API key policies. One requires the x-server-key header while the other requires the x-api-key header. In both cases, however, they use the same authentication scheme. We use a claim check to differentiate them. Last, we define a policy that allows authentication via BasicAuthentication with an Administration role -or- API key.
Here’s some fun magic though. Similar to having multiple authorization attributes, requirements on a policy are additive. If you want requirements that are “either/or”, you need to get a little tricky. I specifically included the final policy as an example for this. If you want to deep dive into this, I invite you to read this other post by Andrew Lock. For this example, however, just know that behind the scenes it uses two implementations of IAuthorizationHandler which consume my custom ApiKeyOrPublicResourcesAuthorizationRequirement requirement.
Implementing our Policy-Based Authorization
Now that we have authentication and authorization enabled along with a few custom policies, it’s time for us to put it into practice!
For this example, I’m just using the traditionally included WeatherForecastController. Let’s go ahead and leave it open at the controller level–that is, no Authorize attribute. Now remember, by not specifying anything our FallbackPolicy applies here. Since that’s the case, let’s go ahead and decorate the Get method with [AllowAnonymous]. With these changes, everything will still work “as normal”.
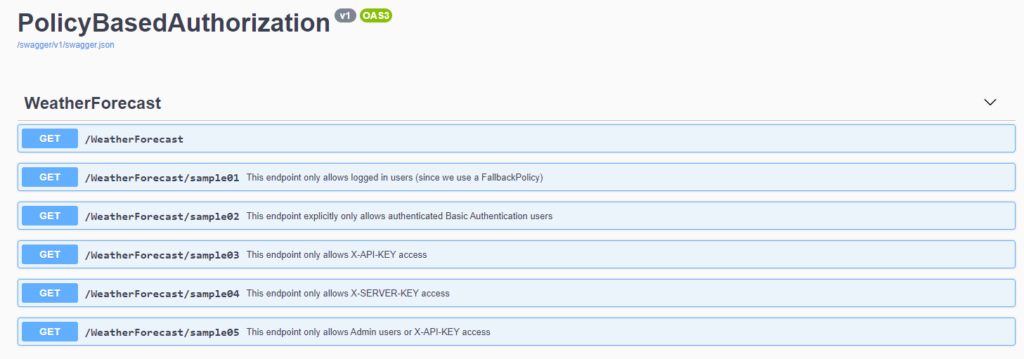
In order to demonstrate the rest of the policies, however, we need a few more endpoints. Let’s create samples for each one. We’ll end up with a total of six endpoints. I’m only going to highlight a couple below. Please look at the code for more.
[AllowAnonymous]
[HttpGet]
public IEnumerable<WeatherForecast> Get()
{
	var rng = new Random();
	return Enumerable.Range(1, 5).Select(index => new WeatherForecast
	{
		Date = DateTime.Now.AddDays(index),
		TemperatureC = rng.Next(-20, 55),
		Summary = Summaries[rng.Next(Summaries.Length)]
	})
	.ToArray();
}

/// <summary>
/// This endpoint only allows logged in users (since we use a FallbackPolicy)
/// </summary>
/// <returns></returns>
[HttpGet("sample01")]
[SwaggerOperation(Summary = "This endpoint only allows logged in users (since we use a FallbackPolicy)")]
public IActionResult Get_Sample01()
{
	return Ok();
}

/// <summary>
/// This endpoint only allows X-API-KEY access
/// </summary>
/// <returns></returns>
[HttpGet("sample03")]
[Authorize(Policy = AuthorizationPolicies.XApiKeyAccess)]
[SwaggerOperation(Summary = "This endpoint only allows X-API-KEY access")]
public IActionResult Get_Sample03()
{
	return Ok();
}


/// <summary>
/// This endpoint only allows Admin users or X-API-KEY access
/// </summary>
/// <returns></returns>
[HttpGet("sample05")]
[Authorize(Policy = AuthorizationPolicies.BasicAuthenticationOrXApiKeyAccess)]
[SwaggerOperation(Summary = "This endpoint only allows Admin users or X-API-KEY access")]
public IActionResult Get_Sample05()
{
	return Ok();
}
Proof is in the pudding
Since this post is getting long, I think we should let our integration tests do the talking. In the sample code for this post, you will find an integration test library. This library contains authentication tests for each endpoint. I didn’t go through the trouble to properly hook up Swagger. Trying it there will only work with endpoints that require Basic Authentication.
Extra credit
There are more ways to configure a policy than the examples I included. I wanted to call out a “silver bullet” you may want to make use of. Assertions. In real-life code, I’ve made use of it only a handful of times. One use-case I ran into was having it require specific JWT scope(s). Regardless, you’ll want to be aware of it to handle edge cases you may run into.
Conclusion
In the past we’ve secured applications with role-based or claim-based authorization. A powerful new way of thinking is applied via policy-based authorization. In this post we’ve defined several different policies and shown how each works. We also learned that you can secure an application by default using a FallbackPolicy.
Credits
Photo by Markus Spiske on Unsplash
More reading
Here is a collection of links I used while educating myself on the topic:
- Microsoft on Authentication
- Microsoft on Policy Schemes
- Documentation from Microsoft on limiting identity by scheme
- MSDN Magazine on Policy Authorization
- Ken Dale on defaulting authentication
- Scott Allen (may he rest in peace) on experimenting with authentication schemes.
- Round the Code on adding Basic Authentication
- ReadTheDocs on custom policy authorization